Tuesday, January 31, 2012

Photo Challenge!!

For all you bloggers out there like me who have a hard time getting on the computer everyday, this may be perfect for you!!

I'm sure you all know what a photo challenge is, so I won't explain it. The one I'm using is from
 Fat Mum Slim and it seems great.  So if you want to challenge yourself like I am, go ahead and join!!

All my photos will be posted at the link right under my blog header!!

Monday, January 30, 2012

The BEST Chili Queso Recipe

Ooookay, I'm not a great cook.  So I wouldn't even call this cooking. 
I just went to red robin and had their queso, and this is better, cheaper, so easy, and SO yummy.  It was SO good, I didn't get any pictures.  SOOO, here you go!! 


You Need:
1 Jar Tostitos Salsa Con Queso
1 Can Hormel Chili, Hot


Directions:
Mix the whole Jar of Queso, and the whole can of chili over the stove top (You can microwave it but the cheese doesn't heat evenly. Stir it very frequenty until hot.  Then, eat it!!!


The Tostitos Queso is good alone, but with the chili it really makes it taste like you made it from scratch.  Go ahead, try and not eat all of it in one sitting!!


Friday, January 27, 2012

Pins of the Week

It's finally Fridayyyy!!

Which means I get to spend some much needed time with my boyfriend and family :)

I've been very pin happy this week and have LOTS to choose from, so narrowing it down was rough.  These are my top choices, but check out my other boards too cause they're awesome.

Click HERE to go to my pinterest :)

Here is an amazing picture of my boyfriends cat. 


His name is Simba and he's a persion rescue cat. 
Hes fiesty, and hes very picky with who he likes (I'm his fav).


Have a great weekend!

XOXOX


Wednesday, January 25, 2012

What I wore (last) Wednesday!!

Well, today I'm wearing scrubs, and since this is my first what I wore post does it really matter that my outfit is from a week ago??

Didn't think so...
 

My shirt is billabong that I got for Christmas from my God Mom.
Jeans are Miss Me..LOVE them!!
Although not in the picture, I wore black vans.

I'm workin on creating a more mature wardrobe but I'm a broke college student, so I work with what I have ;)


I have so many great tutorials for this next month!!  So keep checking back!!


Have a great Wednesday!
 

Tuesday, January 24, 2012

Back to Basic Makeup Tutorial

Ok, so here it is.  The nitty gritty basic makeup.  I have spent countless hours (and money) on finding the best basic look.  And for me, most of it is focused on getting my best skin.  Now, certain brands and types of foundations or powders all depend on your skin type so what works for me may or may not work for you. 

***I AM NOT A PROFESSIONAL MAKEUP ARTIST.  This is a great tutorialf or people who don't know a whole lot about makeup.

I always start with toning or washing my face depending on how oily I am in the morning.  Then I moisturize, and begin applying my makeup.

I don't have the best makeup brushes, but they aren't the worst either.  But if your having trouble with your makeup application, upgrade your brushes. 

Overview of steps:
1. Liquid foundation for basic coverage.  I use FIT by Maybeline right now, it layers very nicely. A great foundation in a higher price point is MakeUp Forever. LOVE IT, just to expensive for me right now.
2. Tinted mineral powder (extra staying power and great coverage).  I use Bare Minerals
3. Translucent powder (to make it last) Just Covergirl for right now, SUPER cheap for tons of powder.  I prefer to use Sephora's brand of translucent powder, I'm just out.
4. Bronzer-Again, Covergirl.  But I also love Bare Minerals.
5. Blush- Sephora or Bobbi Brown.  I would never go back to a drugstore blush, this is the one product that I have actually noticed a difference.
6. Eye Shadow- I use Clinique every day. If you have cheap eye shadow, slurge and buy a great eye shadow primer, it won't crease!!
7. Eye Liner- I've been using Bare Minerals, but I think I'm going to switch to a water proof kind soon.
8. Mascara- Anything in the pink and green tube. Trust me.
DONE!!

Putting up a picture with no makeup took alot of courage, so be nice :)


Step by Step:
1. Start with a fresh, clean face
2. I use Philosophy When Hope Is Not Enough Serum and the Walmart version of Aveeno moisturizer.
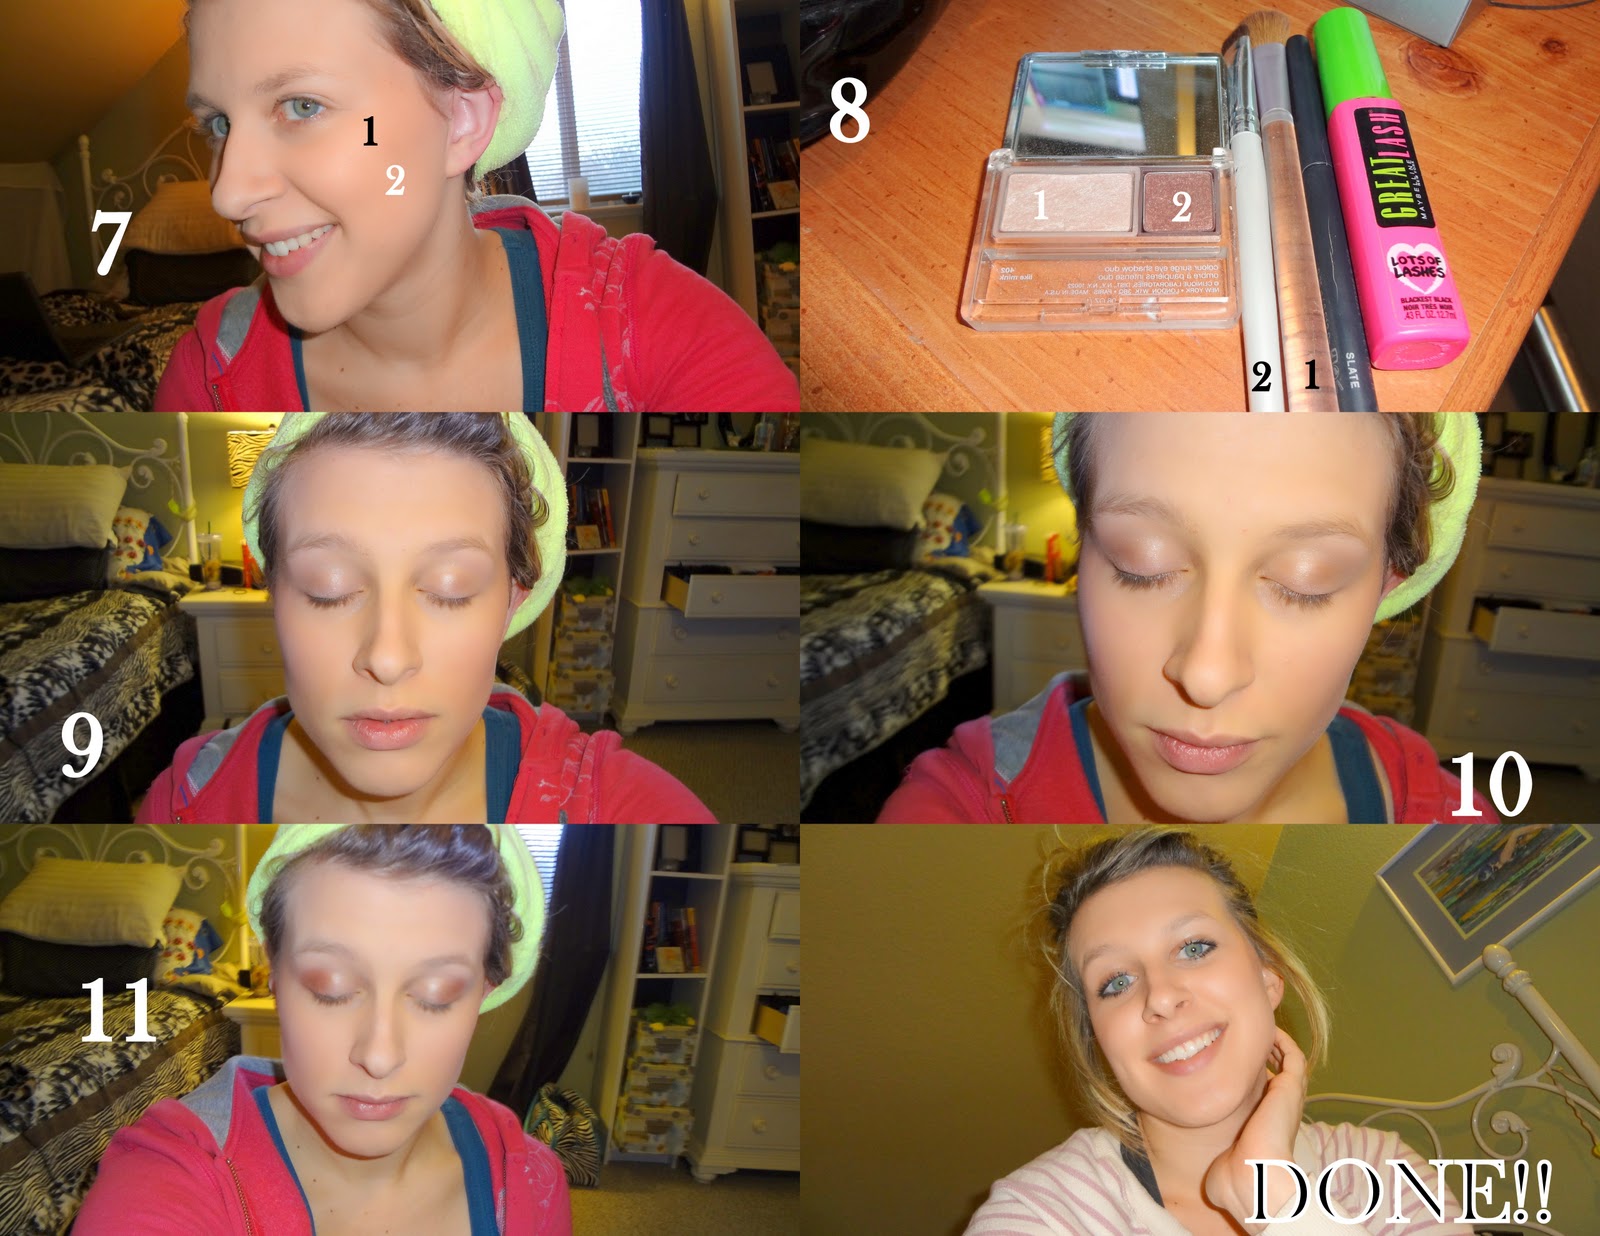
3. Just a labeled view of my makeup bag with the brushes numbered.
4. First, take your liquid foundation and put three dots on your forehead, both cheeks, one on your nose, under your nose, and chin.  Brush 5 is the type of foundation brush I use.  I find it delivers a lighter finish than the ones like a paint brush.  Just use circular motions to blend. Make sure you cover your eyelids also, it provides a base for shadow.
5. I use brush number 2 and use it smooth out foundation and provide heavier coverage to areas where the foundation didn't cover enough.
6. Use a big powder brush to cover your face lightly.
7. Using brush 1, I apply bronzer to the upper portion of my cheek bone.  Also apply some to the bridge of your nose, lower jaw line on one side of your face, and your hairline on one side of your face.  Then I use brush 3, my angled blush brush, to apply blush right underneath the bronzer.  Use powder brush to blend.
8. My eye makeup..
9.  Light color number one goes on whole lid using brush one all the way from inner corner up to brow bone.
10. The darker color goes on outer corner using brush two. And into the crease.
11. The dark brown I normally use didn't show up well in pictures so I used a darker brown just to show you where I apply.  For liner, apply on top right at lash line and RIGHT under lower lashes. Then apply mascara!!
12. DONE!

 This takes me about 10 minutes and I love how it turns out.
I hope you like it!!
I'll have a tutorial for this soon :)


A New Pinterest Feature!

Every Friday, I will be featuring my favorite pins from that week!

I am a HUGE pinterest fan and since I took the plunge and happily deleted my facebook, I spend most of my internet time on pinterest. 

If you haven't heard of it, GO TRY IT!!  And while your at it, go ahead and follow me :)


Follow Me on Pinterest

Tuesday, January 10, 2012

Rolled Flower Tutorial

It's been done before..I know, I know.  But here it is, on Pearls and Paisley Co!  It's going to be called the EMMA flower (I know, bad. But it was the first fabric flower type I made)! The pictures are from two different projects but show the steps more clearly.  You can switch this up anyway you like, as with most crafts, it depends on your personal style.

It's very simple...It's under 5 steps (5 step tuesday?)

You need:
Glue Gun
Long strip of fabric
Circle of felt or push pin
Button, rhinestone, bead (or anything else for the middle of your flower)


1. Tie a knot at the end of the strip of fabric and glue it to your felt of pin
(I like the look of folds and unfinished edges so I take a thick piece of fabric and fold it in half losely)


2. Wrap it however you want at the beginning just to cover the felt of pin

3. Start folding it over itself like shown and hot glue it after every fold


4. Keep folding, rolling, and glueing until you like the size and how it looks and glue tail of fabric to the bottom of flower.


5. Glue the button, or in this case pearl bead, to the center (or off center) of the flower, trim felt of edges and ta-da!!

I have used mine on pushpins, huge paper clips to use as bookmarks (which I love and will have a tutorial for soon), on bracelets, necklaces...again, their are so many possibilities!


Linking Here:


Sunday, January 8, 2012

Life Changing Books

I am a huge fan of reading, I always have been.  This last Christmas, I got a Kindle Fire and let me just tell you, it is my new best friend. Since that day, I have read 300 books, okay, 12 books.  But the two I read today by Gayle Forman were absolutely life changing.  Just so you can get an idea of how many books I've read, I have at least 2 full bookshelves full of books and I'm 20 years old.  I love books.  If I Stay and Where She Went had me crying multiple times and really made me re-evaluate the way I look at the world.  Mia, a young women loses everything in a car accident and she has to make a life changing choice.  This book shows the importance of family, the way we take things for granted, and whether or not life is worth living if everything you live for is gone.  There is so much more that my tired brain can't even write or put onto paper about the amazingness of these books.  All I can say is you need to read these.  Please. And if you do, let me know how you like them.

*Edit-Here is a link to some reviews..


This is the first one...


And this the second...

You won't be able to not read the second so I suggest having it on hand before you even finish the first one.


Life changing I tell ya.

Also, if you're a reader, buy a Kindle Fire. Amazing and very comparable to the iPad.  The internet doesn't work as great as the iPad but it has apps and everything :)

Oh, and if you doubt the amazingness of this book, read some reviews.

Have a great night everyone!!

Saturday, January 7, 2012

Vintage Love

So here are some things from my last blog that I posted tutorials for.  The zebra cork board idea came before I was into blogging or even Pinterest so I definitely was proud of my creation...but then I realized that apparently I'm not the only creative person on the planet. Who woulda thought...haha. The mirror just turned out amazing and I love it :)

I made some silk singed flowers..maybe a future tutorial on those since fabric flowers are one of my favorite thngs to make. I also made some rolled fabric flowers and vintage lace bows. 


If you look close you can see my favorite part of the mirror.  The design in the wood is fleur de lis's on the whole border. It's amzing.  

The Zebra Bulletin Board came from an ugly, old gold frame from my grandma.  I knew I could do something with it so I spray painted it black and it looked amazing. I didn't get a picture of the frame before, but here are some pictures.


I also created some push pins and scrapbook paper covered clothespins.

bad picture..but you get the idea right?

So there it is. Two of the best things I've ever made!!